ZF 4HP22 step by step.

#21
Upshift X300 info:
'D1- D2' is shifting, figures after that are in MPH
Light Throttle: D1-D2 10/11 D2 - D3 16/23 D3-D4 24/29 Lockup 49/53
Up to kick down Point: D1-D2 32/38 D2 -D3 58/64 D3 -D4 79/81
Past Kick Down ( full throttle) D1 -D2 37/43 D2- D3 65/71 D3 -D4 90/103
there are also figures for downshifting but I think for comparison these will do. If anyone wants the down shift figures I'll list them.
 
#22
Warren,
As you noted thr
e RR pawl is thicker than the BMW one.
If you fit the thicker one in the BMW tailpiece, it will lock up when you tighten the bolts.
I found out the hard way.

Jim.
 
#25
Hi,

interesting thread, I have supplied a few parts and kits to do similar conversions on rovers, MG's and Stags, and another option would be to fit an electric 4HP22 and control it with the compushift :

http://www.ashcroft-transmissions.co.uk/compushift.html

this allows you to map all shift points relative to throttle position, adjust the converter lockup speed, add tiptronic control etc,

also for the speedo this may be useful :

http://www.egauges.com/SearchResults.asp?Search=437-155&Submit=Search

Dave Ashcroft
 

rockdemon

Administrator
Staff member
#26
Hi Dave, interesting stuff. Does this mean you could use an electronic donor zf box rather than having to be careful which variant you start out with?

Rich
 
#28
rockdemon said:
Hi Dave, interesting stuff. Does this mean you could use an electronic donor zf box rather than having to be careful which variant you start out with?

Rich
yes it does but the compushift makes this an expensive option if this is the only reason you want electronic,

Dave
 
#29
eightofthem said:
Yes, you would need the EH version, these have the XYZ selector fitted at the gearbox end, and also have the solenoid activated valve block.
yes but you will need one of the 3 switches on our website,

for those that want an easy life we can supply arebuilt electronic or hydraulic auto box with the V8 converter/bellhousing and 2 wheel drive back end, also with the starter ring gear / flexplate parts, dipstick, range rover shifter etc,

note the V8 bellhousing will rotate the auto box about 20-25 degrees so ideally you will need the deeper range rover sump but this may reduce ground clearance,

what did you guys do about this ?

Dave
 
#30
I also have the both H and EH versions available fully rebuilt, with a choice of rear mounts for various applications, along with all the items required for ease of fitting, along with the option of flat pan sumps, or the deep belly sumps.
i have one more LDV box left ( this has a speedo cable output ) if you need this type.
It seems to be a popular option when replacing the three speed, and it is good to see that it is being well catered for, which is good news for the owners, the cars, and the suppliers.
 

WarrenL

Active Member
#31
ashtrans said:
note the V8 bellhousing will rotate the auto box about 20-25 degrees so ideally you will need the deeper range rover sump but this may reduce ground clearance, what did you guys do about this ?
It's actually only about 10 degrees, Dave. The tilt is towards the pickup, and I used the BMW pan, making sure that it was filled correctly and the dipstick marked accordingly. No further problems, certainly none in use. The LR sump is too low for the P6 - you end up with a smidge over 100mm of ground clearance, and a car that looks like it's pregnant.

As covered in the ZF general discussion thread, I've used the Dakota Digital ECD-100 to drive my speedo - the major advantage is that your stock speedo remains untouched, rather than having to install an aftermarket dial or have its guts removed and replaced with electronics; an option I explored early on but abandoned in favour of the Dakota, which was a doddle to install.

I've also used the stock P6 selector, unmodified, operating the ZF lever by means of a Jag XJ40 cable (eightofthem's tested solution). People mustn't believe the pub stories - all positions are available (PRND321) using the P6 selector. Only cable adjustment is required.

The final solution will vary from car to car, but mine ended up as follows:

- '94 Land Rover Discovery gearbox.
- 'At the front: '94 Discovery bell housing (with three fins ground back for clearance, more on this in the near future) torque converter, spacers, crank adapter and flex plate.
- Stock P6 starter motor. The LR ring gear, if not the flex plate itself, is identical to the P6B item, so the P6B starter motor remained untouched during the conversion.
- At the rear: BMW tail housing, output shaft and parking pawl/gear; and a custom-made crossmember that bolted to the existing P6 transmission tunnel brackets. No welding of the car required.
- Land Rover governor and valve body.
- BMW sump and filter.
- Jaguar XJ40 output yoke/flange. Required a few millimetres milled off the leading edge of the shaft to make it sit properly in the BMW rear seal, but it mates exactly to the P6 propshaft.
- Totally unmodified P6B propshaft. Just bolted it back in where it used to go. This may not be the case if you use a Jag rear end, and almost certainly won't be if you use the Sherpa/LDV box.
- Stock P6B selector operating the ZF via a Jaguar XJ40 cable (more on this in the near future).
- A hybrid TV/kickdown cable, made from the existing P6B cable with LR/BMW fittings grafted on to the gearbox end. Cost me $20 to have it made from my existing parts.
- A filler/dipstick tube made from the LR item and some flexible hose. I reused the LR dipstick (cut down a little) but plan to modify the BW35 dipstick since it's a much classier item. Fits in the top but needs to be shortened.
- Dakota Digital ECD-100 speedo converter (as described above).
- Custom cooling lines utilising the LR fittings and shaped to meet up with the existing cooling lines running along the side of the engine block.
- A dedicated transmission cooler. Needed! The first longish run showed that the piggy tail in the P6B radiator just wasn't going to cut the mustard.

I did almost all the work myself, but it was hard going at times for somebody who'd never peeked inside an auto transmission before. It will be very good if those looking for an easier path can purchase what amounts to a kit. I can't recommend the ZF enough. The smoothness alone is quite remarkable after the BW, but the overdriven top gear and lockup torque converter have totally transformed the car. I hope a few Forumites more take the plunge - so far I'm the only confirmed completion. We have one underway (Geordie Jim) and an estate that has been fitted with a 3.9 EFI/ZF combo at some point way back in the dim darks but appears to have been languishing just short of completion (although its future is now looking brighter).
 

corazon

Well-Known Member
#32
WarrenL said:
ashtrans said:
I hope a few Forumites more take the plunge - so far I'm the only confirmed completion. We have one underway (Geordie Jim) and an estate that has been fitted with a 3.9 EFI/ZF combo at some point way back in the dim darks but appears to have been languishing just short of completion (although its future is now looking brighter).
Don't forget me Warren :wink:
My zf 22/24 hybrid box is underway, it's just taken a back seat for a while since the 4.6 engine turned up!
Once the box is completed I need to finalise how I'm mounting the B&M shifter to the tunnel, and finally choose the new electronic gauges. Likely one of these sets I linked to http://www.classicroverforum.net/viewtopic.php?f=16&t=17809
Mounting my particular box casing/tail should be a simpler prospect than your bmw one...
Jim
 

WarrenL

Active Member
#33
corazon said:
Mounting my particular box casing/tail should be a simpler prospect than your bmw one...
Whoops! I had forgotten you... now, you'd better explain that ease of mounting. Mine was easy. It was making the cross member that proved a challenge (remember we have strict compliance and certification rules here).
 

ghce

Well-Known Member
#34
Hopefully I will be embarking on this enterprise shortly, not so much because my 65 isn't doing it's duty but because I want to change my reserve O-Ring and front engine mounts and also sort out some prop shaft vibration and with the box out and the car on a hoist these jobs will be hopefully a doddle.
Of course with all the know how, tech and on the job experience of both John and Warren it will be a less daunting task plus it will mean I can get my ZF off the garage floor and out of the way in my very full garage.

Graeme
 

corazon

Well-Known Member
#35
WarrenL said:
corazon said:
Mounting my particular box casing/tail should be a simpler prospect than your bmw one...
Whoops! I had forgotten you... now, you'd better explain that ease of mounting. Mine was easy. It was making the cross member that proved a challenge (remember we have strict compliance and certification rules here).
PM sent Warren :wink:

Jim
 

WarrenL

Active Member
#36
STEP 4: MAKING SURE YOU HAVE ALL THE NECESSARY BITS UP FRONT

A couple of thread pages back I covered the reassembly of your ZF with the 2WD output shaft installed. There are still a couple of tasks to carry out there, but I'll come back to those. Right now you've got your overhauled ZF sitting on the bench, mostly reassembled, and it is a good time for me to break into your thought train and remind you to make sure you have all the bits you need to connect the front of the ZF to the rear of your V8 engine. I must stress at this point that what follows covers only the use of an early Discovery/Range Rover 4HP22 as the principal donor box. From what I've briefly seen, there are some differences in the paraphernalia up front on the later vehicles (say post-facelift Discoverys). Others will be better qualified to comment on this, and so I will restrict this post to my own experience.

Clearly you need the Discovery/Range Rover bell housing and torque converter! You also need the flex plate. Its diameter and ring gear teeth are identical to the P6's, so YOU DON'T NEED TO DO A THING TO YOUR P6 STARTER MOTOR! This is very handy. However, you can't use your P6 flex plate, at least not without modifications (new holes, etc) which I have been advised are inadvisable due to the nature of the spring steel it is made from.

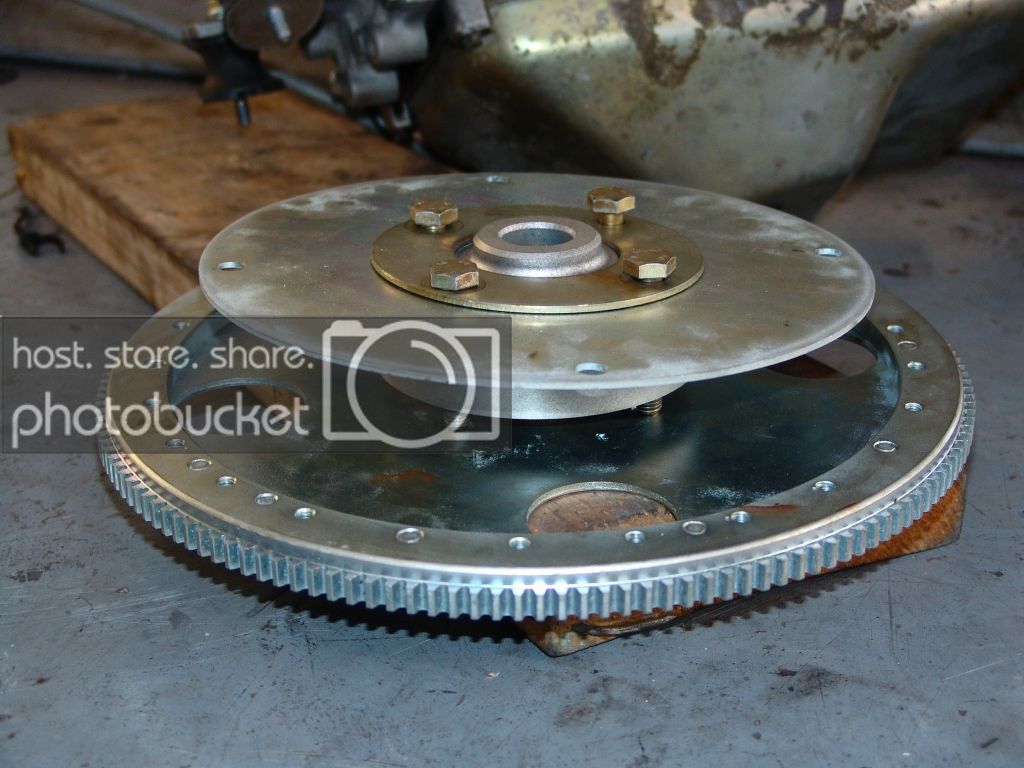
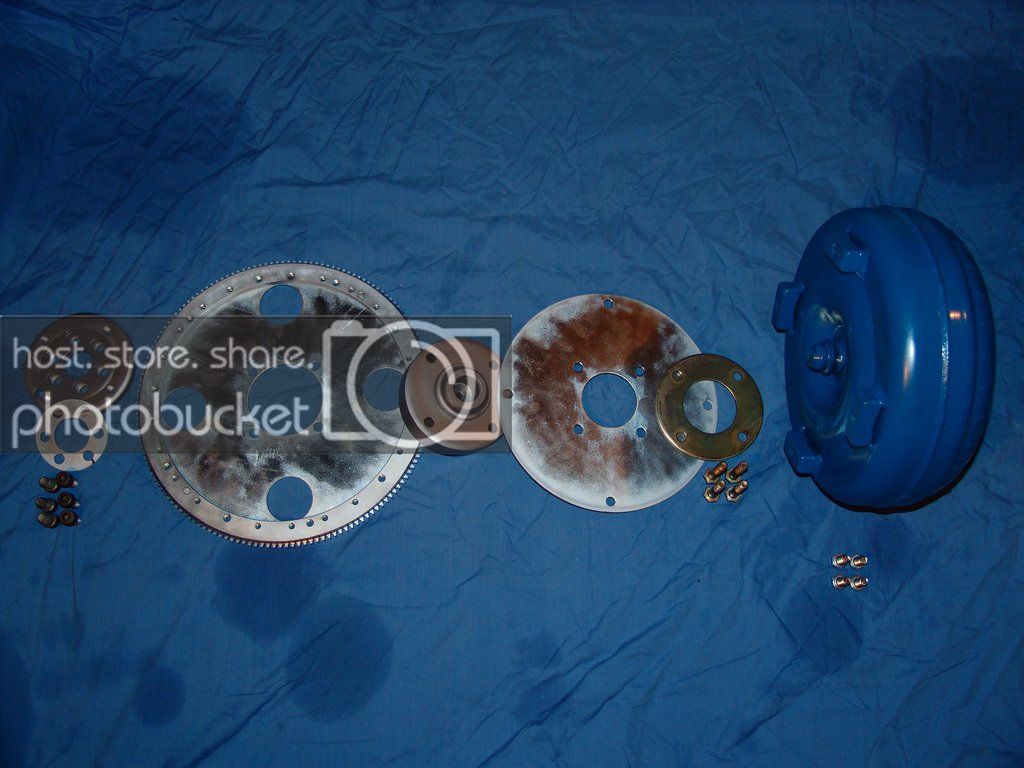
For the Landie torque converter and flex plate to fit properly, you need the crank adapter and associated spacers, bolts and small flex plate from the Discovery/Range Rover donor. These parts are all displayed in the following photograph, in order of installation:


All fitted together, the intermediate bits look like this:


Make sure you've got everything! If you're missing the bolts, this website gives the sizes/threads:

http://www.allbrit.de/UNI.cfm?PAGE=772736&SPRACHE=EN#9

I've read at least a couple of stories circulating on the web concerning the origins of all this gubbins. The one that sounds most likely is that when Rover switched the classic Rangie from the original Chrysler 3-speed auto to the ZF in 1985, they accommodated the shorter ZF by designing a longer bell housing and using spacers, rather than redesigning the transfer case and rear cross member. There has to be some method somewhere in the madness.

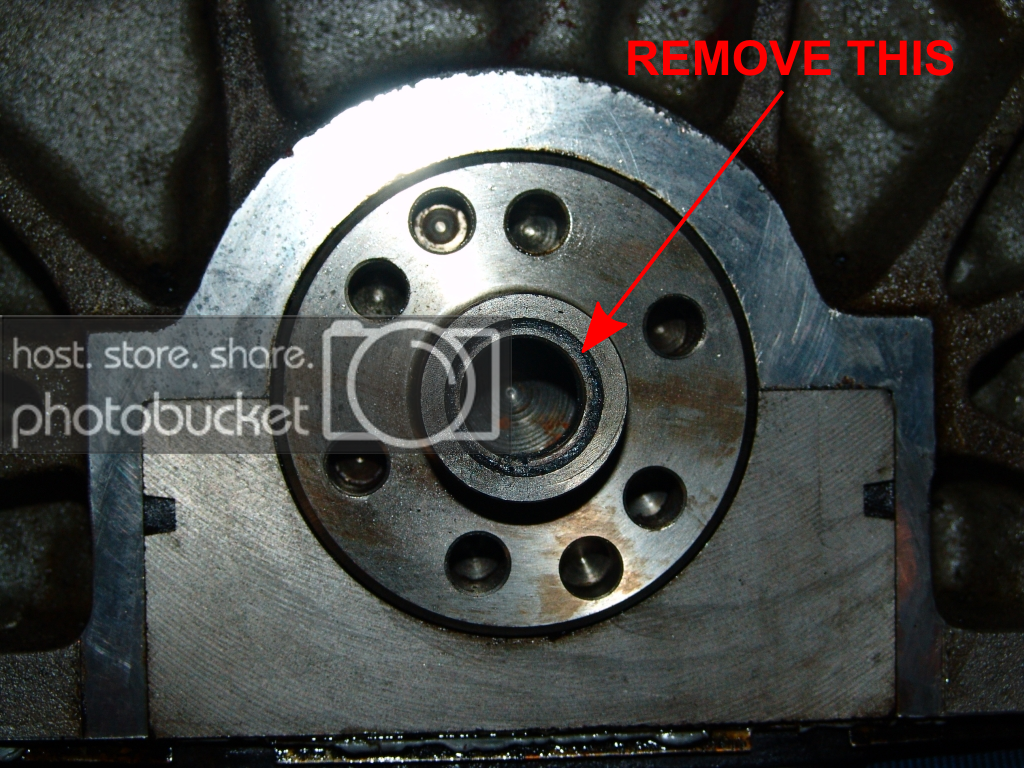
One last thing for now. There is a bush in the P6 crankshaft spigot that gets in the way of the Landie crank adapter. There was a brief debate in the general ZF discussion thread about whether this should be removed or the adapter machined to fit, and the consensus was in favour of the easier option: removing the bush. Even so, it was tightly pressed into place and it took a bit of effort with an air-powered hacksaw to cut the bugger through, but once it was fished out the Landie crank adapter sat very snugly in the spigot:


In the next post I will detail what needs to be done to your new bell housing to make it fit in the P6's tunnel, and then we'll return to the rear of the ZF.
 

WarrenL

Active Member
#37
STEP 5: MAKING THE BELLHOUSING FIT.

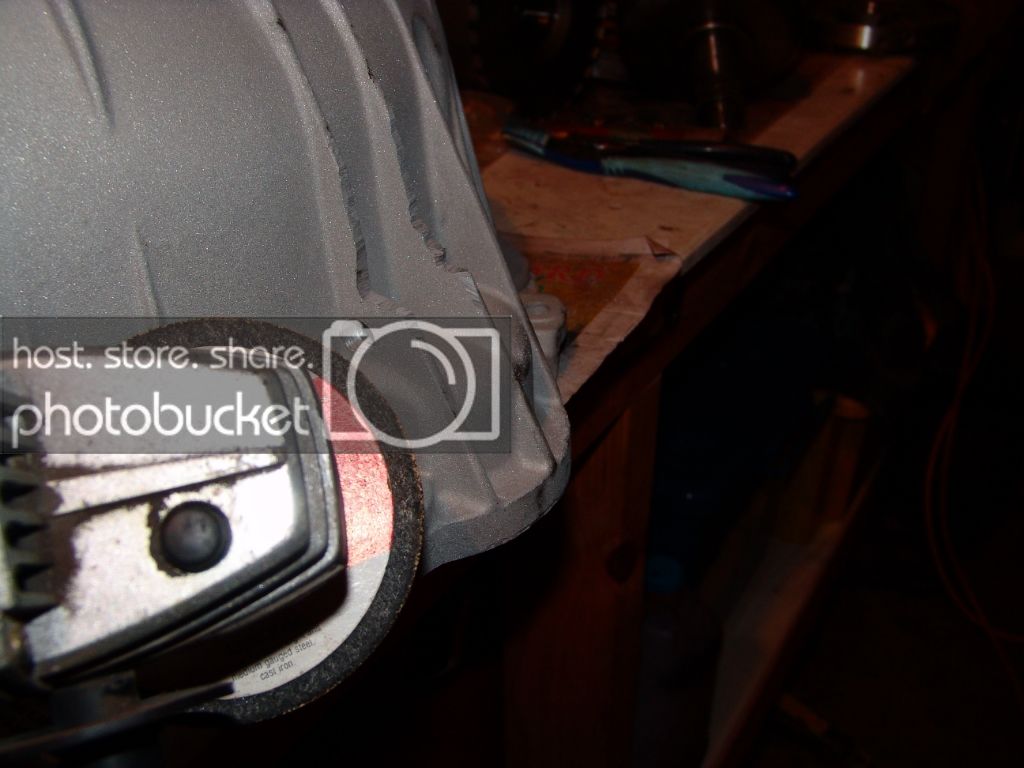
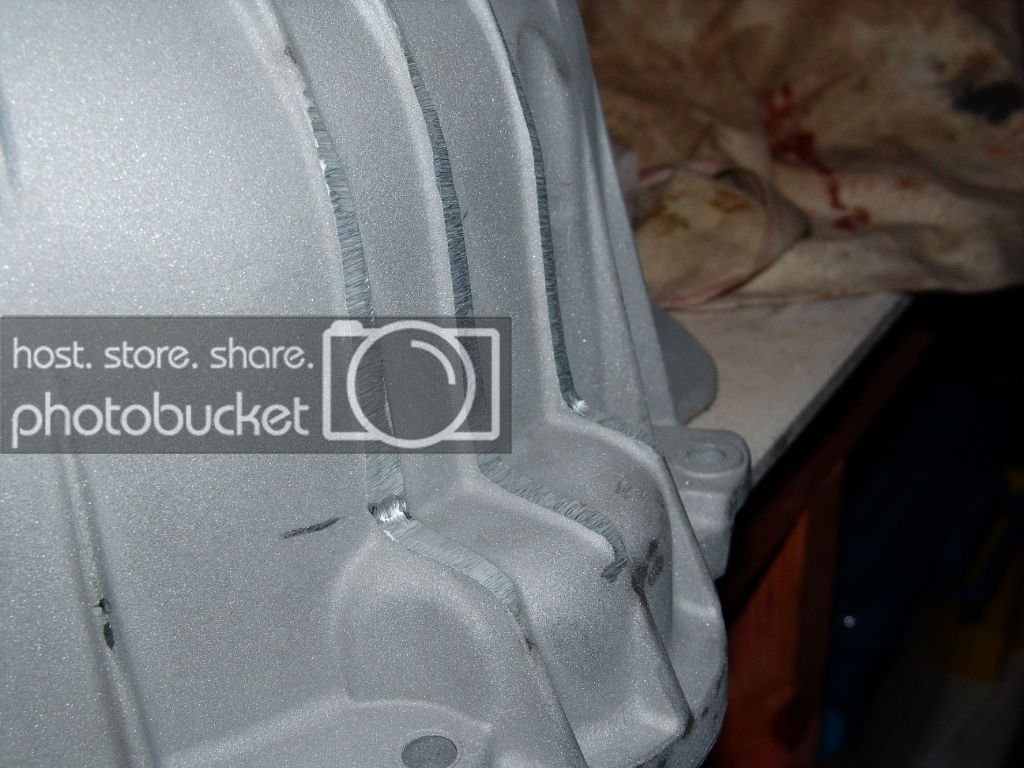
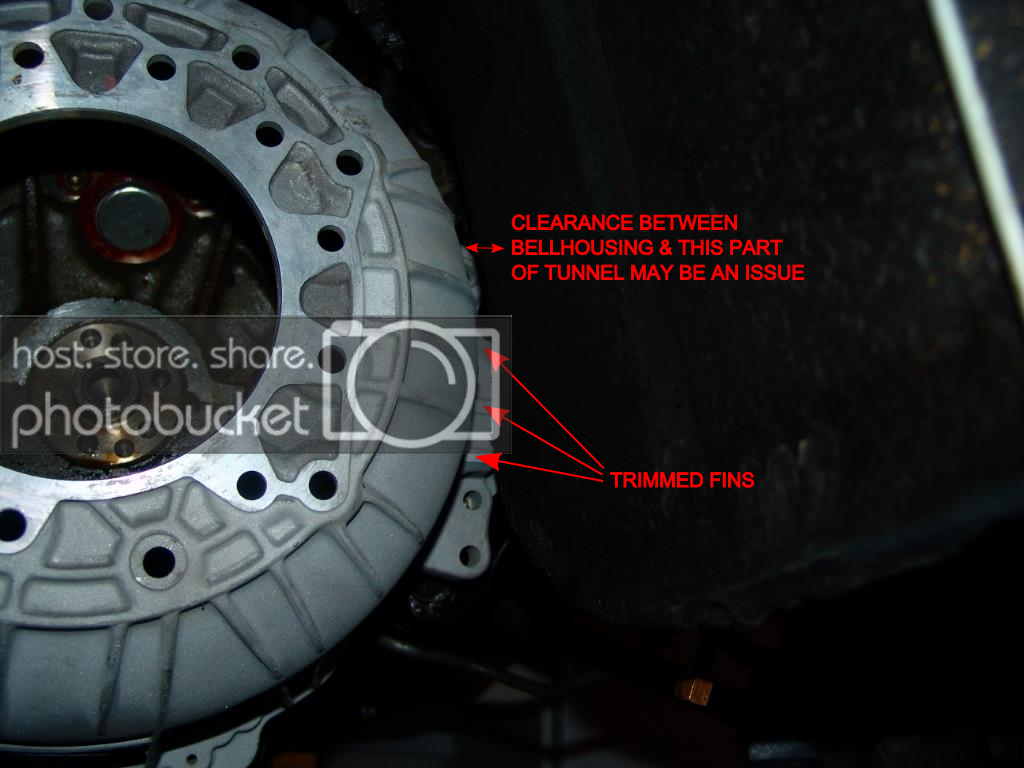
Of major concern to those contemplating the installation of a ZF is the question of whether the Land Rover/Range Rover bellhousing will fit. Rest easy, it does. You only need carry out one, and possibly two modifications. The first is to the housing itself. To clear the forward right-hand-side edge of the transmission tunnel, you must chop a little out of the three fins behind the starter motor bulge (if this bump has a proper technical term, please let me know). Metal guys probably have more adept ways of doing this, but I started by drilling a hole to form a nice curved inner corner and then took to the rest with the angle grinder, followed by a sanding disk to make it look nice.


Getting there:


And finally, when all tidied up and fitted:


You may find at this point, or when you come to trial fit your gearbox, that there is a clearance issue as marked in the photo above. I suspect it will vary between individual cars, but I had only about 5mm here. I decided this wasn't enough to cope with potential movement of the gearbox and engine so I took to the tunnel with a rubber mallet and created a bit more room. Much better to be safe than sorry and have to drop the whole kit out again when your bell housing is knocking as you drive. It only needed a few discerning gentle thumps to create some extra clearance, and a bit of fresh underseal where the mallet exposed some primer. Nothing can be seen from within the footwell - any reshaping is well buried beneath the carpet and insulation.

Next, we'll return to the rear of the gearbox, which is where things get interesting...
 

PeterZRH

Well-Known Member
#40
OK, as a mechanical moron can I ask the obvious mechanical moron question here?

If this was done as a complete installation, what sort of cost would we be looking at? Or is this strictly within the realms of the enthusiastic spanner wielder (I was in tears by the end of the first page) or "I could have bought another show condition P6 with that"?

I believe the XJ40 I've driven had this box and it was pretty good for the mid 1980s, certainly light years ahead of the 3 speed unit in my Audi 100 of the time (a truly bizarre combination of high-tech car and geriatric gearbox)
 
Top